


← All help topics · Instructor
Start with a course draft and review its description, curriculum and access settings before publication.
On desktop #
- Open My workspace → My Teaching → Instructor Panel.
- Choose Courses, then Create Course.
- Enter a clear course title in Overview. Set the course to Draft while preparing it.
- Write a description that explains the intended learner, the problem addressed, prerequisites and what the learner will practise.
- Add the featured image, category and tags that fit the course. Follow the file-type and size limits displayed by the upload field.
- Save the course before adding curriculum sections. The editor explicitly asks for this before it can add a section.
On mobile #
Use a desktop browser for course authoring while the mobile editing controls remain limited. Select Desktop above to read the editing instructions and watch the recording.
Use the three editing areas #
- Overview: title, description, image and classification.
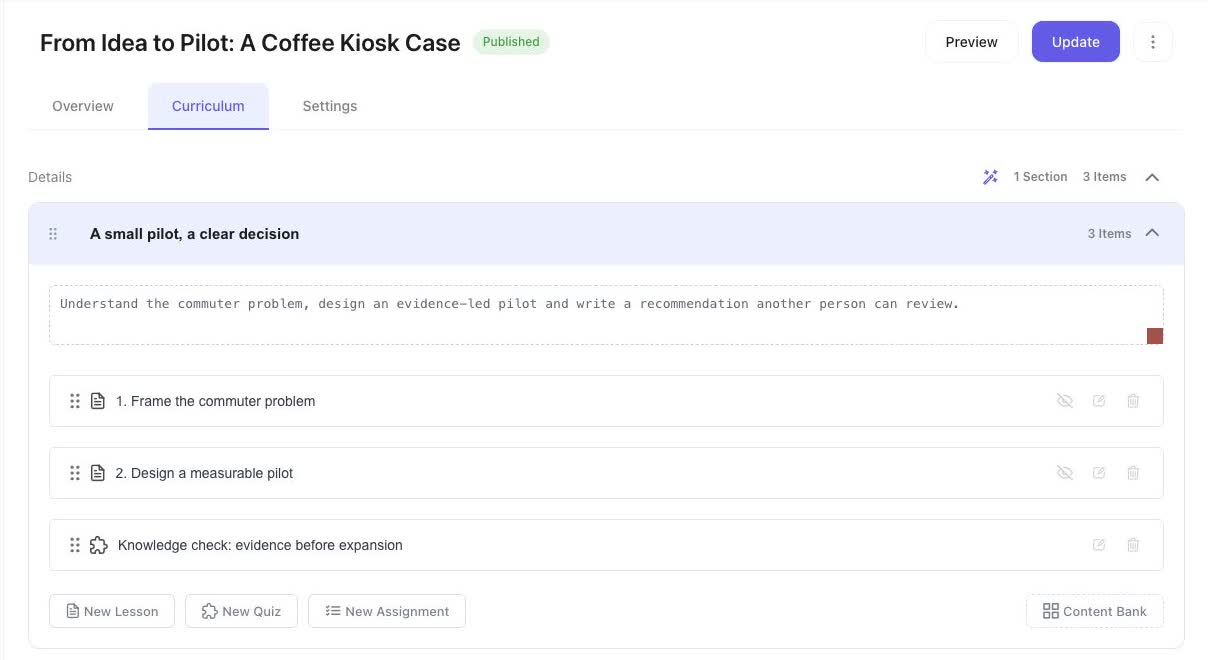
- Curriculum: sections containing lessons, quizzes and assignments.
- Settings: duration, price, assessment and other course rules.
The panel’s main navigation also provides Lessons, Quizzes and Questions. Use the course curriculum to check how those items are arranged for this course.
If you do not see My Teaching #
The help’s Instructor switch does not grant instructor permissions. See Become an instructor for the entry route. If you expect author access but the panel is missing, contact support with your account and the course you need to manage.
Review the learner-facing page #
Use Preview to review the course page. Check the language, image, title and summary as well as the curriculum. Save your intended changes and verify them again. Publication controls depend on your permissions and any review process applying to your account.
Plan a focused practice course #
From Idea to Pilot: A Coffee Kiosk Case uses one fictional situation throughout. The first lesson frames the commuter problem; the second designs a measurable pilot. A two-question knowledge check asks learners to distinguish observations from assumptions and choose evidence for an expansion decision.
Describe the intended outcome, prerequisites and expected study time before building the activities. This example takes about 30 minutes and asks for a short decision brief. Give every activity a meaningful title; use realistic paragraphs rather than placeholder words.
Find a course shared with you as co-instructor #
A co-instructor contributes to a course owned by another instructor. The owner and co-instructor are separate assignments; becoming a co-instructor does not transfer course ownership.
- Ask the course administrator to add your instructor account to the course.
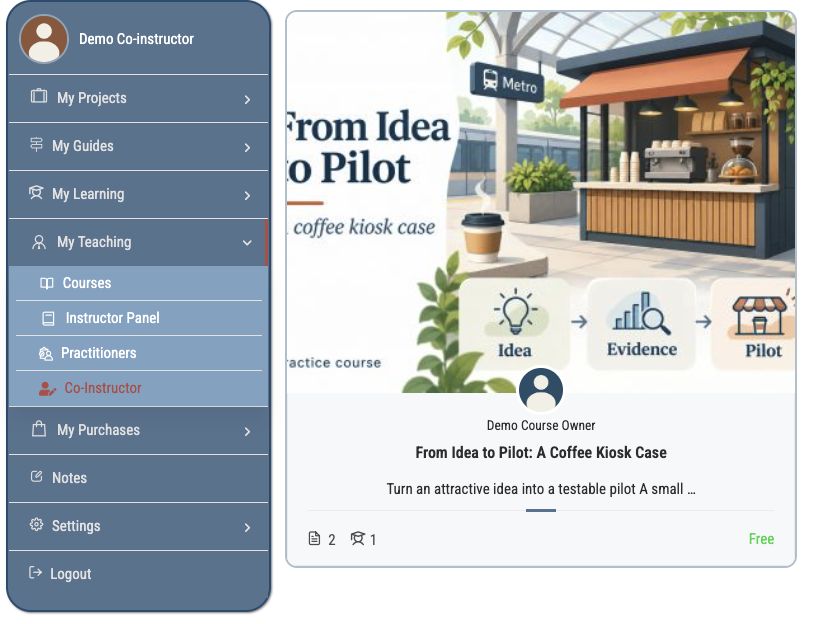
- Open My workspace and expand My Teaching.
- Choose Co-Instructor. Find the shared course and check its title and displayed owner.
- Select the course card to review its public course page.
For course administrators: assign the contributor #
- In WordPress, open LearnPress → Courses and edit the intended course.
- Open Course Settings → Author. Confirm the existing course author.
- In Co-Instructors, select the intended instructor account. Keep the author unchanged when you only want to add a contributor.
- Update the course, reopen these settings and check that the assignment remains saved.
- Ask the contributor to check My Teaching → Co-Instructor under their own account.
The selector offers instructor and administrator accounts. A practitioner account needs the appropriate instructor role before it can be selected.
Current limitation: a shared course can appear under Co-Instructor while being absent from the editor’s Courses list. If that happens, contact the course administrator. Do not create a duplicate course. The complete editor navigation walkthrough will be added after this issue is corrected.
Interface reviewed on 12 November 2026. Screens shown are from the development environment.


