
Total Project Management Framework
Home

Framework

  • Framework overviewTotal Project Management Framework
  • TPM Lifecycle MapOne system, from the whole project to each method
    • Project Steps
    • Tool Levels

TPM platform

  • AI Project AdministratorFlagship feature of the TPM platform

Approach

  • Human-in-the-Thought-Loop Paradigm
  • Human-in-the-Thought-Loop Manifesto
  • Research & Evidence
Map the work.See the whole project and choose your next step.

Learning

  • Learning with TPM
  • All courses
  • Become an instructor

Course categories

  • Marketing and Sales
  • Finance and Investment
  • Project Management
  • Art and Design
  • IT and Programming
  • Personality Development

Instructors

  • Our instructors
  • Claudia Martínez
  • Emily Johnson
  • May Soon
  • Mirko Vuchkovich
  • Oleksandr Ivanov
  • Ryan Smith
Back to schoolImprove your skills every day – learn from industry leaders!

Learn and Work!

  • Log In
  • Membership Levels
Learn and Work!Improve your skills every day – learn from industry leaders!

Blog

  • All articles
  • Marketing and Sales
  • Finance and Investment
  • Project Management
  • Art and Design
  • Personality Development

Events

  • All eventsWorkshops and conversations
  • Share your expertiseExplore becoming an instructor
Bring your experienceArticles, events and people of the TPM community.
  • About TPMThe system, founder and team
  • Founder
  • Training cases
  • Team
  • Contact TPM
People behind TPMFounder, team and educational practice.
  • English
  • Русский
  • Українська
    • TPM header AI layout (CSS)

    • TPM shared footer navigation

    Home
    System

    Framework

    • Framework overviewTotal Project Management Framework
    • TPM Lifecycle MapOne system, from the whole project to each method
      • Project Steps
      • Tool Levels

    TPM platform

    • AI Project AdministratorFlagship feature of the TPM platform

    Approach

    • Human-in-the-Thought-Loop Paradigm
    • Human-in-the-Thought-Loop Manifesto
    • Research & Evidence
    Learning

    Learning

    • Learning with TPM
    • All courses
    • Become an instructor

    Course categories

    • Marketing and Sales
    • Finance and Investment
    • Project Management
    • Art and Design
    • IT and Programming
    • Personality Development

    Instructors

    • Our instructors
    • Claudia Martínez
    • Emily Johnson
    • May Soon
    • Mirko Vuchkovich
    • Oleksandr Ivanov
    • Ryan Smith
    Learn and Work!

    Learn and Work!

    • Log In
    • Membership Levels
    Community

    Blog

    • All articles
    • Marketing and Sales
    • Finance and Investment
    • Project Management
    • Art and Design
    • Personality Development

    Events

    • All eventsWorkshops and conversations
    • Share your expertiseExplore becoming an instructor
    About
    • About TPMThe system, founder and team
    • Founder
    • Training cases
    • Team
    • Contact TPM

    Practitioner

    7
    • Create and find your first TPM project
    • Use the step workspace, article and AI panels
    • Work with the AI Project Administrator
    • Find courses and follow your learning
    • Understand membership, AI access and course access
    • Find your way around My workspace
    • Resolve common navigation and access problems

    Instructor

    5
    • Open the Instructor Panel and prepare a course
    • Build a course curriculum
    • Set course assessment and completion rules
    • Set course duration and downloadable materials
    • Set a course price and review publication
    Help Centre
    Practitioner

    Use the step workspace, article and AI panels

    ← All help topics · Practitioner

    English · Русский · Українська

    Work on the step, consult its explanation and ask for help without losing the context of the project.

    Instructions for:Choose Desktop or Mobile. Both versions are available below when JavaScript is disabled.

    On desktop #

    1. Open a project step. The breadcrumb identifies the project, phase and step.
    2. Open Workspace layout in the breadcrumb.
    3. Choose Three-pane to keep the step, article and AI assistant side by side. Choose Practice for the step and AI, with the article on demand. Choose Theory beside for the article beside the step.
    4. Use the tabs inside the step to move between its records. The next-tab arrow reveals tabs that do not fit. A tab is part of the current step, not a different project.
    5. Close or minimise a panel when you need more room. Use its opening control to bring it back.
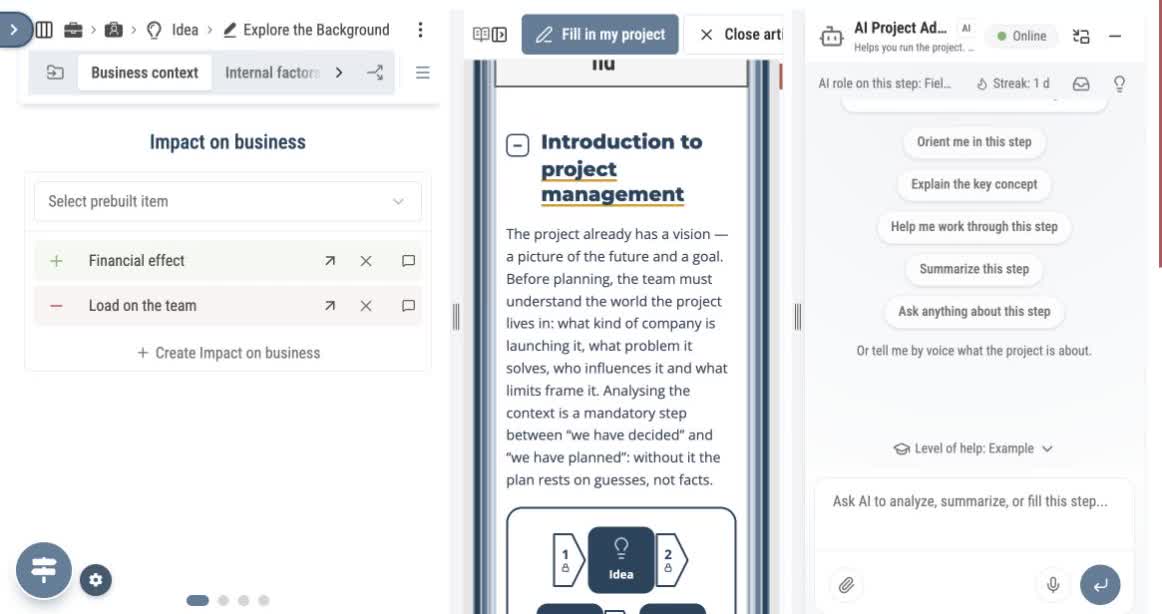
    Open the recording
    Switch from Three-pane to Practice using Workspace layout. The recording shows real interface actions at their original pace. Use the player controls to pause or replay.
    Step, article and AI displayed side by side
    Three-pane workspace. The screenshot uses demonstration content. Select the image to enlarge it.

    On mobile #

    1. Open the project step. The step is your main working surface.
    2. Tap Open AI Project Administrator to bring up the AI panel.
    3. Minimise AI to return to the step. Tap Theory of this step in the step toolbar to open the article. You can also use Read theory alongside from the AI panel. On a phone, the article opens as a panel.
    4. Use Close article to return to the previous view. Minimise the AI panel to return to the step.
    5. Move between record tabs inside the step. Scroll the current panel when content continues below the screen.
    Open the recording
    Open AI and minimise it to return to the step. Actual interface actions, cropped and edited to omit the shared header and loading waits. Gold marks show the recorded taps. Pause or replay with the player controls.
    Open the recording
    Open the step article, read it and close it. Actual interface actions, cropped and edited to omit the shared header and loading waits. Gold marks show the recorded taps. Pause or replay with the player controls.

    Read the method beside your work #

    The article explains the current step. Fill in my project returns you to applying it. Use the article’s structure to find a particular explanation. For the relationship between phases and steps, open the Lifecycle Map.

    Read and edit a longer project description #

    In Explore the Background → Business context, Company description can hold several paragraphs. Keep the company context, proposed work and constraints together in a readable description.

    1. Open Context details if the section is collapsed.
    2. Edit Company description. Use paragraphs to separate the company background, proposed initiative and operating constraints.
    3. Move to another area, then return to check the text. Reopen or reload the step when you need to verify that your latest changes were saved.
    1. Open Business context. This view is divided into four horizontal panels.
    2. Use the third pagination dot below the panels to reach Context details. Scroll back to the field if the pagination control is below the visible area.
    3. Tap Company description. Scroll inside the field to read the remaining paragraphs; scrolling the page moves the surrounding panel.
    4. After editing, leave the field and return to check your text. Reopen the step to confirm the saved result.
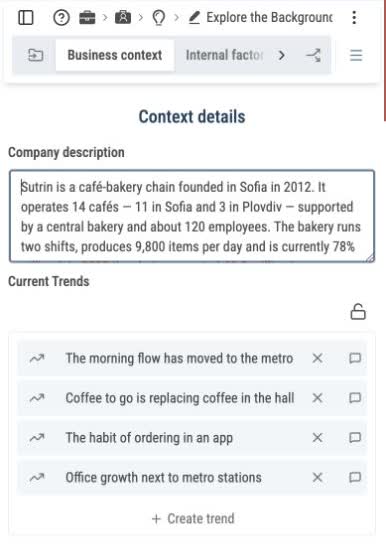
    The Company description field and current trends in the mobile Context details panel
    The field contains a three-paragraph example. Scroll within it to read the remaining text. Select the image to enlarge it.

    A description may be longer than the field’s visible height. Check its end before assuming that the text is missing.

    Edit a goal in the side panel #

    For a detailed goal, use the side panel to keep the outcome and its measurement criteria together.

    1. In Explore the Background → Business context, choose Practice and minimise AI if the workspace is narrow. Open Scope revision beside Charts.
    2. Find the goal under Strategic Project Goals or Non-Strategic Project Goals. Hover over its card to reveal Open in side peek, then select the arrow.
    3. Review Title and describe the metric, target, deadline and verification method in Description. Scroll within a long field to reach its remaining text.
    4. Select Save. Reopen the goal to check the saved values. The title and two-paragraph description in this example were also checked after reloading the step.
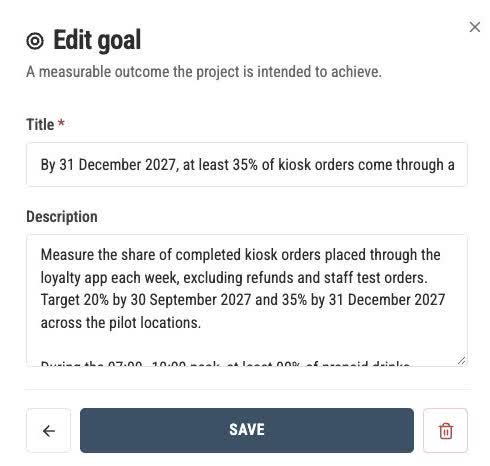
    Edit goal side panel with a measurable outcome, detailed description and Save button
    The side panel keeps the goal title and measurement criteria together. Select the image to enlarge it.

    Edit a PESTEL factor and find it again #

    Open your project map, choose Research, then Macro Factors Analysis. The example below uses the small coffee-chain demo copy. Use Theory of this step for the method itself.

    Edit on desktop #

    1. In PESTEL analysis, select the factor card. Alternatively, open PESTEL summary table and use the row’s Open in side peek arrow.
    2. Review the factor and category. Scroll inside the form to reach Baseline value, Current value and Unit.
    3. Keep the observation clear: for example, baseline 6, current 8 and unit “kiosk sites”. Check the linked Metric and Data source.
    4. Use Comment for the implications, conditions and next review. A multi-paragraph comment can extend beyond the field’s visible height; scroll inside the text box to read it.
    5. Choose Save. Reopen the factor to check the result. Reloading and reopening the step also lets you verify that the saved text is retained.
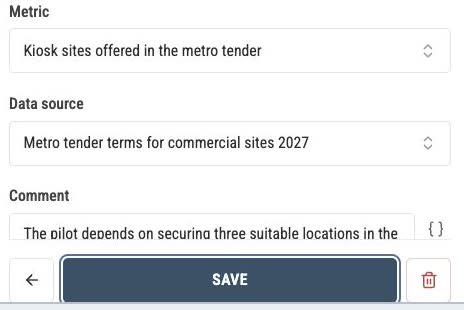
    Metric, data source, comment and Save in the factor form
    The lower part of the desktop form. The comment continues inside its text box. Select the image to enlarge it.

    Find a factor in the summary table #

    1. Open PESTEL summary table. Use Category to narrow the records, for example to Political.
    2. Enter part of the factor name in Search…, such as “metro”. An unmatched search produces an empty result.
    3. Clear the search and return Category to its unfiltered state to see the other groups again.

    Edit on mobile #

    1. Open PESTEL analysis. Use the pagination controls beneath the board to reach the category you need, then tap its factor card.
    2. The factor opens in a form over the step. Review the name, category and fields near the top.
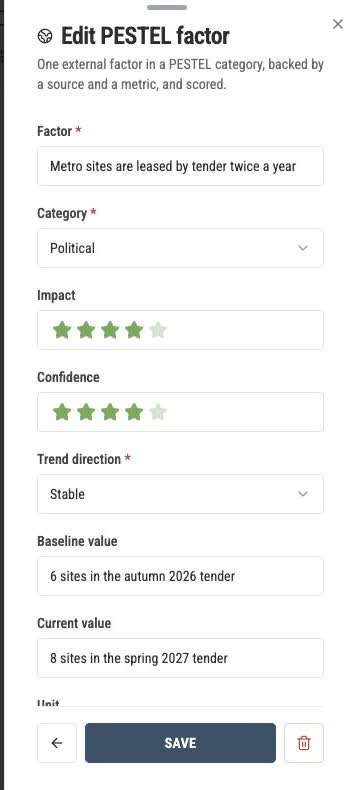
    Mobile Edit PESTEL factor form with its Save button
    The factor form has its own scrolling area. Select the image to enlarge it.
    1. Scroll inside the form to reach Unit, Metric, Data source and Comment. Scrolling the page behind the form does not reveal these fields.
    2. Enter a useful comment with the context, constraints and next action. To read a longer comment, scroll inside the comment box itself.
    3. Tap Save, reopen the factor and check the saved values. The example was checked after reloading with a two-paragraph comment.
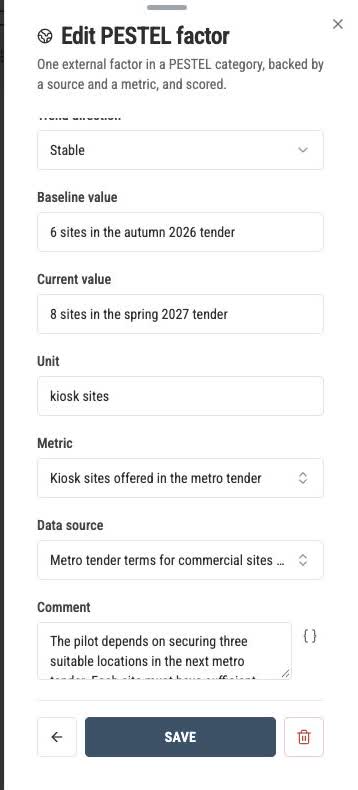
    Mobile factor form scrolled to unit, metric, source and comment
    Save remains at the bottom while the form content scrolls. Select the image to enlarge it.

    Read the other table columns #

    In PESTEL summary table, a narrow screen displays the factor name and a subset of columns. Use the numbered Column set controls below the table to move between these subsets. In the seven-field example, set 1 shows Trend direction and set 6 shows Comment. The factor name stays visible so you can identify the record.

    When the screen feels crowded #

    First identify which area you are scrolling: the step, the article or the AI conversation. Then choose a layout for the task you are doing. Reading a long explanation is easier in Theory beside; entering records with occasional help suits Practice. On mobile, close the top panel before trying to interact with the step behind it.

    Interface reviewed on 12 November 2026. Screens shown are from the development environment.

    Previous guideCreate and find your first TPM projectNext guideWork with the AI Project Administrator
    What are your Feelings

    Share This Article :

    • Facebook
    • X
    • LinkedIn
    • Pinterest
    Still stuck? How can we help?

    How can we help?

    Updated on 13.11.2026
    0%
    Table of Contents
    • On desktop
    • On mobile
    • Read the method beside your work
    • Read and edit a longer project description
    • Edit a goal in the side panel
    • Edit a PESTEL factor and find it again
    • When the screen feels crowded

    More help

    • Create and find your first TPM project
    • Work with the AI Project Administrator
    • Find courses and follow your learning
    • Understand membership, AI access and course access
    Total Project Management Framework

    Map the work. Run the steps. Own the decision.

    Framework

    Framework overviewTPM Lifecycle Map
    • Project Steps
    • Tool Levels

    Approach

    ParadigmManifestoResearch & Evidence

    Learning

    Learning with TPMAll coursesOur instructorsBecome an instructor

    Community

    BlogEvents

    About

    About TPMFounderTraining casesTeam

    Workspace & help

    My workspaceMy membershipMembership levelsGetting started
    EnglishРусскийУкраїнська
    Public offerPrivacy+380 98 019 07 89[email protected]

    Login with your site account

    Lost your password?

    Not a member yet? Register now

    Register a new account

    Are you a member? Login now