


← All help topics · Instructor
Organise the course into meaningful sections, then add lessons and activities in the order a learner should use them.
On desktop #
- Open the saved course in Instructor Panel → Courses. Choose Curriculum.
- Enter a section name in Create a new section and choose Add Section.
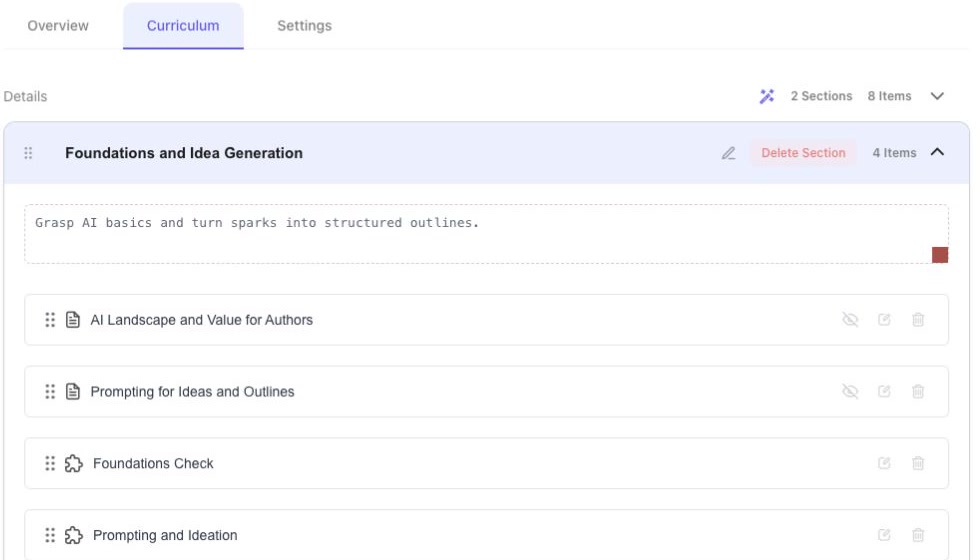
- Expand the section with its arrow. Add a description if learners need an explanation of the section’s purpose.
- Choose New Lesson or New Quiz according to the activity. Use Content Bank to select existing content.
- Use the section and item drag handles to change their order. Keep prerequisites before the activities that depend on them.
- Use the edit control beside an item to review its content. Check the intended order in the course preview after saving.
On mobile #
Use a desktop browser for course authoring while the mobile editing controls remain limited. Select Desktop above to read the editing instructions and watch the recording.
Choose the right activity #
- Lesson: explain, demonstrate or provide material to study.
- Quiz: ask questions that contribute to a check or assessment.
Use an Assignment when learners must submit work for review. The steps below cover lessons and quizzes.
State the required outcome before selecting the activity type. Keep the task instructions, time allowance and assessment rules consistent.
Control what can be previewed #
The curriculum item controls include Enable/Disable Preview where supported. Review the course page after changing preview access so that the material available before enrolment is intentional. Do not treat an eye icon as a substitute for checking the learner-facing result.
Before you finish #
Check section titles, item titles, sequence, empty items and reused content. Review assessment settings separately: adding a quiz to the curriculum does not by itself determine how the whole course is passed. Avoid removing or replacing activities from a live course without first considering learners already in progress.
Write and review a lesson #
- Open the saved course and choose Curriculum. Expand the section containing the lesson.
- Choose New Lesson to create a named lesson. To edit an existing lesson, use its Edit in popup control beside the title.
- In Overview, check the title and write the lesson in the visual Description editor. Use headings to separate the situation, explanation and exercise.
- Open the lesson’s Settings tab to review its duration. The example’s first lesson is 8 minutes. Preview controls whether the lesson can be read without taking the course; leave it off when enrolment is required.
- Return to Overview to review the text, then choose the lesson editor’s Update. Reopen the lesson and check that your saved content remains.
- Close the lesson editor to return to the curriculum. A section description has its own Update action; save it before leaving the field.
Use a desktop browser for this editing sequence while the narrow-screen curriculum controls remain limited. The recording shows the desktop interface.
Update a section description #
A section description explains how its activities fit together. Use a short, concrete paragraph stating what learners will work on and what they should produce.
- In an open course editor, choose Curriculum.
- Expand the intended section using the arrow at the right of its heading.
- Select the description field beneath the section title and revise the text.
- Choose the Update button immediately below the description. This saves the section description.
- Reopen the course and expand the same section to confirm the saved wording.
Use a desktop browser for this editing task while mobile curriculum controls remain limited. Select Desktop above to see the steps and recording.
When several instructors contribute, agree who is revising a section and review the saved text before the next teaching session.
Interface reviewed on 12 November 2026. Screens shown are from the development environment.


